Saturday, July 4, 2009

Red Velvet Cake

Happy 4th, everyone.

Oh dear, has it really been two months? My apologies for the lapse in recipes! Time seems to get away from me and before I know it, it’s summertime. It is at these times I debate whether or not I should move to Seattle where I hear it rains 50% of the year, and the highs in the summer range around the mid-70s. I think I could get used to that.


I’m continuing work and taking a molecular biology laboratory class. So far it’s very exciting. What does everyone else have planned for the summer? Some beach visits or perhaps a good hike with a picnic? Don’t forget your sunscreen and bring lots of H2O!


This dessert is well known for its smooth, rich, and sweet flavor. With a hint of chocolate it is well recognized by its distinct red color. I made it for a friend of mine who will be moving out of state.

Red Velvet Cake with Cream Cheese Frosting


Did you know? Without food coloring, red velvet cake will still have a slight red color due to the cocoa being "Dutched" by baking soda. The Dutch Treatment involves treating regular cocoa, which is naturally acidic, with an alkali (such as potassium carbonate) in order to neutralize to cocoa. The Dutch process darkens the color of cocoa to a deep reddish brown and mellows the flavor. Baking soda is often used for leavening, and the alkaline baking soda will "Dutch" regular cocoa, producing a red color as if it contained Dutch process cocoa. Red food dye, of course, will drastically enhance the color of the cake.


For the cake:


2 1/3 cups sifted cake flour
1 tablespoon unsweetened cocoa powder
1 ½ teaspoons baking powder
½ teaspoon baking soda
¼ teaspoon salt
¾ cup unsalted butter
1 1/3 cup sugar
3 large eggs1 tsp vanilla1cup buttermilk
1- 3 tablespoons red food coloring

For the frosting (this is the doubled recipe for the layered cake):

16 oz. Cold cream cheese
10 tablespoons unsalted butter (softened)
4 tsp. Vanilla
3 ½ cups powdered sugar (more or less based on your taste preference)

How to make the cake:


Preheat the oven to 350 F. Have all ingredients at room temperature. Grease and flour two 9 x 2-inch or 8 x 2 inch round cake pans or line the bottoms with wax or parchment paper.


Whisk together flower, cocoa, baking powder, baking soda, and salt until thoroughly blended.


In a separate large bowl, beat ¾ cup unsalted butter (1 ½ sticks) until creamy. Gradually add 1 1/3 cup sugar and beat on high speed until light and fluffy (about 3 to 5 minutes).


Whisk together 3 large eggs and 1 tsp. Vanilla, then slowly add to butter/sugar mixture. I decided to save a bowl and just slowly beat in the eggs and it seemed to turn out fine.


Beating at a low speed, add the flour and buttermilk, alternating in 3 parts flour, 2 parts milk. Add red dye with the first batch of buttermilk. Beat until smooth.

Divide batter and spread evenly in pans. Bake until a toothpick inserted into the center comes out clean. Depending on the oven, the time will vary between 20 – 30 minutes. In the last ten minutes I would keep a close eye on the cake. Allow the cake to cool for a while before removing to a rack. Let cool completely before applying frosting.


How to make the frosting:


Using an electric mixer, beat cream cheese, butter, and vanilla at a low speed until just blended.


Add the powdered sugar 1/3 cup at a time (taste frequently to determine when you want to stop adding the sugar). Beat until smooth and desired consistency is reached. You are welcome to stir in additional flavoring such as lemon or orange zest, ground cinnamon, or liqueur. I topped the cake with strawberries and blackberries.


How to assemble:


Slice thin layer off the top of one of the cakes to make the surface flat.


Frost to liking.

Add 2nd layer of cake and complete frosting.

All that's left is to snarf it down.


Saturday, May 2, 2009

All You Wanted to Know about Artichokes and More

There was a rather poor fellow by the name of Arty. He was not a very successful or talented person and was in search of a better job that would pay more. Arty decided he was going to become a thief. The next day Arty hid outside of a Food Mart grocery store waiting for the customers. A young woman passed by and he jumped out and demanded all her money. She began to scream hysterically, and Arty panicked. In desperation he choked her to keep her silent. He rummaged through her purse only to find one dollar. While he was searching the purse another passerby saw Arty. Arty quickly ran over and choked the man. Unfortunately he, too, only had a dollar in his wallet. Arty decided he would rob one more person before giving up. He was hoping to hit the jackpot. He strangled the next person only to find a dollar in their pocket. Arty was picked up a block away by the police. The next day the headlines of the paper read:

"Arty Chokes Three for a Dollar at Food Mart".

How to Shop for Artichokes:

When choosing which artichokes to purchase, look for ones that are a deep green in color and are relatively heavy for their size. The leaves should be tightly formed and "squeak" when pressed. Avoid artichokes that have split leaves, are brown, or have started to open.


How to Store Artichokes:

Artichokes can be refrigerated for up to four days in a plastic bag (unwashed).

How to Cook Artichokes:

There are a variety of ways for one to cook these vegetables. They can be boiled, steamed, stuffed, or microwaved.

Did you know? Artichokes contain copious amounts of phenolic compounds. Phenols are a group of chemical substances found in plants typically characterized by the presence of phenol units. They are constructed from a simple closed ring of six carbon atoms and a hydroxyl unit (-OH). Raw artichoke is very astringent due to these compounds reacting with our salivary proteins. Cooking reduces the astringency by disrupting the cells and casuing the phenolics to bind to different molecules. This lowers the amount of free phenolics that cause astringency. Some phenolics even have antioxidant and cholesterol-lowering effects.

Steamed Artichokes


Artichoke(s)
Garlic
Butter
Lemon

Artichokes have small thorns at the end of the leaves. We do not eat the entire leaf so they are easily avoided; however, some people prefer to remove these thorns. With a scissor snip off the tips of the artichoke leaves. We will also cut off about 1 inch from the tip. Cut off any excess stem.


Rinse the artichoke under cold water.

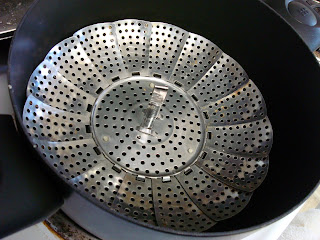
Fill a large pot with several inches of water and crush a garlic clove (or two) into it. Place a steaming basket in the pot and add the artichokes. They should not be covered with water as we want to steam them, not boil them.


Cover the pot and bring water to a boil. Once a boil is reached, reduce to a simmer and allow to cook for 25 -45 minutes. The time it takes depends on the size of the artichoke. Check occasionally to determine if done. This can be checked by removing the outer leaves. They should be pulled off easily.

An alternate way of steaming is using a pressure cooker. Cooking time is about 15 - 20 minutes.

While we let the artichoke cool for a bit, we can make the dipping sauce!!! Put some butter into a small bowl and melt in the microwave. Add some lemon juice. And we're done!


Pull the leaves off one at a time. Dip the tip of leaf in the butter and scrape off the soft, pulpy part with your teeth.


When we get to the center you will notice a bunch of fuzz (the "choke"). We can scrape this part off with a butter knife or spoon, revealing the heart. The heart is honestly the best, most succulent part of the artichoke. I got overly excited and impatient and ate the heart before I remembered to take a photograph of it. My apologies. Cut into pieces and dip in the butter. Enjoy!

Thursday, April 23, 2009

Eggs Benedict

When I originally started this food blog I was under the impression that keeping it up to date would be a piece of cake. My thought process was that I could make an entry every day. Of course that task would be more realistic if I didn't have to work or go to school (or sleep). I slightly omitted those facts in my excitement and blogging enthusiasm. As enjoyable as sharing the love of cooking is, it's also quite time consuming! The whole process includes: cooking, taking pictures, thinking of what to write in my introduction, typing up a legible recipe with directions, arranging pictures, and researching interesting scientific facts to include. One of the most difficult tasks is the picture taking. It's relatively easy to take pictures of the process, but I always forget to take pictures of the final product!!! I usually only remember after I've devoured everything, and I doubt an empty plate with crumbs would look very nice.

In this case the plate would have been licked clean of all its saucy goodness.

Eggs Benedict


Bearnaise Sauce (A typical Eggs Benedict recipe will call for Hollandaise sauce. I find Bearnaise adds more oomph.)
Canadian Bacon
English muffins (I use whole wheat ones)
Eggs

Follow the directions on the packet for how to make Bearnaise sauce. Set aside and keep warm.


Toast English muffins and place on a plate for preparation.

Heat Canadian bacon as instructed.

Poach eggs. Poaching means that the eggs have been cooked in water. No oil, butter, or fat is needed.

Did you know? A completed egg is expelled about 25 hours after leaving the hen's ovary. Each egg is about 3% of the hen's body weight. A quarter of the hen's daily energy expenditure goes toward egg-making.

To poach an egg, bring a small to medium pot of water to a low boil. Add about a teaspoon of vinegar to help keep the egg white from spreading. Once the water is at a boil, vigorously stir the water to create a miniature whirlpool. Quickly crack an egg into the water and continue stirring. The stirring also helps prevent the egg white from dissipating in the water.

Wait approximately 3 - 5 minutes for the egg to poach. A poached egg should have a nice, undisturbed, soft yolk surrounded by the solidified, opaque egg white. The result is cooked albumen and runny yolk.

Remove egg from the water with a slotted spoon.

How to arrange the eggs Benedict:
Place the toasted English muffin on the bottom. Add a slice of Canadian bacon to the muffin and top off with the poached egg. Smother in as much sauce as wanted.

Mmm mmmm. I really did lick the plate. Shhh.

Tuesday, April 14, 2009

Almond Tortes

Throughout my cooking and baking escapades I have built up a repertoire of skills and talents. However, there are still things out there that elude me. My dream is to one day be able to:

1) Bake and decorate a tiered cake (using fondant)
2) Create a multi-course dinner
3) Make pasta noodles from scratch
4) Fillet a fish
5) Be able to consistently crack and release an egg with one hand
6) Light my food on fire

While I work hard to improve my egg-cracking skills I can read Gourmet magazine! I drove home recently to visit my parents and was surprised to see an issue of Gourmet The Magazine of Good Living at my doorstep with my name on it. My uncle, with whom I share a love of cooking, had subscribed me to the magazine! First thing I did, of course, was flip through the pages looking at the photographs. Instantly I saw something I knew I had to make immediately when I had the chance.

Almond Tortes


For the crisps:
3/4 cup finely chopped almonds
1/2 cup sugar

1/2 butter
1 tbsp. flour
2 tbsp. heavy cream


For the filling:
1 cup chilled heavy cream
2 tbsp. packed brown sugar
1/4 tsp. ground cinnamon
1 dash ground nutmeg

1/2 tsp. pure vanilla extract (or pure bourbon vanilla extract)

For the Crisps:

Preheat oven to 375 with rack on lower shelf.


In a medium saucepan, combine all the ingredients and heat over medium-low heat until everything is dissolved. Remove from heat and let cool for 15 minutes.


Line a baking sheets with parchment paper. Drop teaspoons of batter 5 to 6 inches apart on backing sheets.

Note: Try to use a light-colored baking sheet because the crisps are more likely to burn on darker ones.

Bake until lightly browned (around 8 minutes).


Remove from oven and cool on baking sheet rack for 5 minutes before removing completely to rack to cool. Let cool completely.

Note: This is what happens when you do not properly read instructions. I failed to place the drops 5 - 6 inches apart on multiple baking sheets. My crisps turned out as one giant, beautiful rectangle crisp. I rectified this situation by taking a scissor and cutting the rectangle into about 20 small squares.


For the Filling:

Beat cream in a chilled bowl until soft peaks form.

Gradually add sugar. Be careful not to over beat. A good indication of over whipping is when the cream starts to look like curds. Although this consistency is not exactl
y whipped cream, it tastes the same.

Did you know? When whipping cream, the agitation caused by the whisk adds air bubbles into the cream. Fat globules in the cream partially coalesce (unite) in clusters, spread and surround the air bubbles. The fat-surrounded air bubble becomes more stable (less likely to pop) and will link to other fat-surrounded bubbles. In between the fat globules are water, lactose, and protein molecules. This crystalline fat structure, along with the other molecules, helps the cream stabilize into those well-known fluffy clouds and become stiff. If the cream is whipped too far, the fat will churn and butter particles are formed.


Fold in cinnamon, nutmeg, and vanilla. You can adjust the amount of spices based on your taste preferences.


How to Assemble Almond Torte


Take one almond crisp and top with whipped cream and berries. Cover with a second crisp. Top off the whole thing with more whipped cream and berries. The crisps are very fragile and break easily. These small broken pieces can be used as garnish. Or you can always use my alternative which is to eat the broken pieces immediately to remove any misshapen crisps. We might as well put them out of their misery.


Saturday, April 11, 2009

Blue Cheese Hamburger

I joined my roommate on an excursion to Target yesterday with no intention of purchasing anything. I was doing pretty well until the VERY last minute when we passed a stand containing era music. It was then that I was faced with a dilemma. On one hand, there was a fantastic CD titled "The Timeless Sound of Big Band Swing" and I had a gift card that would cover the price. On the other hand I had five fingers. So I decided to grab the CD, and boy am I happy with my decision! Makes me want to pick up swing classes again. You gotta jump, jive, and then you wail! (I always thought they were saying "You gotta drunk drivin', and then you wail". It makes so much sense, now).

Every once in a while I get a craving for a giant, juicy hamburger. When I do not cave to hunger and laziness and head to the nearest In 'N Out, I make my own hamburgers. It may not be the classic cheeseburger but, trust me, it's fantastic!

Blue Cheese Hamburger
(Recipe tweaked from Pioneer Woman Cooks)

Hamburger buns (I use whole wheat to maintain an appearance of being healthy, even if it's false)
Ground beef (Once again, try to be healthy. I only buy 96% Lean/4% Fat)
Onions (I prefer red onions for this recipe)
Mushrooms (Optional)
Blue cheese, crumbled
Salad Greens
Butter or Olive Oil
Tabasco sauce or Cholula hot sauce
Mayonnaise
Salt
Pepper


Place your ground beef into a medium mixing bowl.

Did you know? A freshly cut meat surface is naturally purple in color because of the muscle protein myoglobin. As myoglobin is exposed to oxygen it becomes red (oxymyoglobin). That is why the outer surface of ground beef is red while the inside is still purple (it has not been exposed to oxygen).

1 lb. can serve two hungry people. How lean you want your meat is entirely up to you. Obviously there will be more flavor with fatter meats. Add salt and pepper to taste. Add hot sauce to taste. I am a wimp and therefore added a teeny, weeny little splash. The hot sauce adds great flavor to the burger. Mix that meat up so the salt, pepper, and sauce will be distrubuted evenly.


Set meat aside to carmelize onions. Add about 2 tbsp. of butter to a pan over medium-low heat. If using 1 pound of meat for 2 people, I reccomend using a very large red onion (unless you don't like onions. How could you???). Slice the onion and add to pan. Heat on medium heat for about fifteen minutes, allowing the onions to carmelize. Stir/toss onions occasionally. With about 5 - 10 minutes remaining, you can add the sliced mushrooms if using.

While the onions are carmelizing, we can go back to our ground beef. I am all about fairness so let's divide the hunk of ground beef into two equal parts and then form them into patties. Throw the patties onto a skillet or grill (I use something similar to a George Foreman Grill, that way it cooks both sides at once, cutting down the total time!). Cook for about 6 minutes on each side.


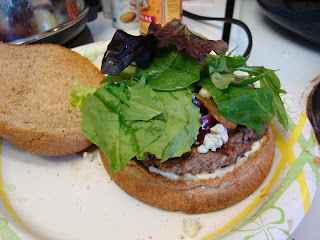
Toast the hamburger buns if you want. Spread with mayonnaise (one can add hot sauce to the mayo for an extra kick, too). Add any other wanted condiments. I stick mainly with mayonnaise. Place patty on bun.


Add a handful of blue cheese to the top of the burger. The way it's done in my photo is in reverse, but I've found it's easier to do the cheese first.


Hopefully by now the onions will be looking like you could eat them right from the pan. Or is that just me? Add a beautiful, heaping pile of onions on top of the cheese and burger.


Add the mixed greens on top of that.


Cover it up with the top of the bun and yay! Have yourself a delicious burger. You will need napkins for this!
Have a happy Easter tomorrow!

Friday, April 3, 2009

Portobello Mushroom Chicken

There is a certain type of calm that blankets the atmosphere when it rains.
It drizzled for a little bit last night when I got out of work. It's a great way to end the day.

My roommate sauteed some mushrooms the other day and inspired me to make this:

Portobello Mushroom Chicken

Portobello Mushrooms
Boneless, skinless chicken breasts
Flour
Onions
Olive Oil
Butter
Balsamic Vinegar
Garlic
Salt & Pepper (to taste)

Because I did not use a recipe for this, there are no official measurements.

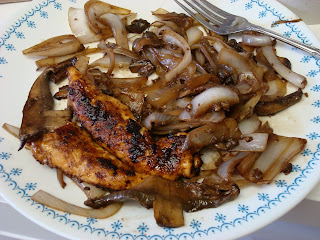
Combine salt, pepper, and flour in a bowl and mix well. Dredge chicken to coat outsides evenly. Pat off any excess flour.


Over medium heat, heat olive oil and butter in medium to large pan.

Add mushrooms and onions to saute. Pour balsamic vinegar over mixture. It's up to you on how much vinegar you want added. I stopped when had a red hue.

Did you know? Vinegar is a solution of acetic acid in water. The word vinegar comes from the French vin aigre, meaning sour wine. Vinegar can be made spontaneously in Nature or induced deliberately. 1st, sugar is broken down into ethyl alcohol and carbon dioxide gas through a process kown as fermentation. The ethyl alcohol is then oxidized (a chemical reaction in which an atiom, ion, or molecule loses electrons) to acetic acid. Bacteria known as Acetobacter aceti help the ethyl alcohol react with oxygen to form the acetic acid.

Place chicken in pan, when sufficiently heated, for about 4 minutes on each side.


Remove chicken when cooked through, remove mushrooms and onions after sauteed.


Option: If chicken is not readily available, one can boil up some pasta and add the mushroom mix to that. It's just as delicious and so much easier!

Add some Parmigiano-Reggiano for extra flavor.

Tuesday, March 10, 2009

Honey Mustard Chicken

Wow, it's been a while since my last post. School and work have been keeping me rather busy these past several days. Finals week is slowly (no, wait) QUICKLY approaching and it's time to buckle down and study hardy! At least my long days and nights of back-breaking studying will pay off when spring break arrives and I can go to New York and Boston. It's going to be one fun week!

Here is something to tide everyone over.

Honey Mustard Chicken (with a twist) & Swiss Chard
(chicken recipe thanks to The Pioneer Woman Cooks)

(There's chicken under that, I swear)

Boneless, Skinless Chicken Breasts
Thick cut peppered bacon (regular bacon works just as well)
1/4 cup Bacon grease
1/2 cup Honey
1/2 cup Dijon Mustard
1/2 Lemon, juiced
1/2 tsp Paprika
1/2 tsp Salt
Crushed Red Pepper (optional)
Cayenne (optional)
Sharp Cheddar Cheese
1/2 cup Vegetable oil

In a large bowl, combine Dijon mustard, honey, lemon juice, paprika, and salt. At this time you can choose to add red pepper flakes or cayenne if you want.

Try to find chicken breasts that are relatively the same thickness. One can wrap the chicken in wax paper and give them a good smacking with a mallet or rolling pin (or can) to make them more even.

Place chicken in sauce mixture and refrigerate. Let marinate for at least one hour.


While the chicken is marinating, or right before you remove it from the sauce, start frying up the bacon. Do not cook too thoroughly as it will later go into the oven. Reserve 1/4 cup of the bacon grease.

When ready to cook the chicken, preheat oven to 400 degrees F.

Remove chicken from the fridge and pour off any excess marinade.

In a frying pan over medium to medium-high heat, heat up the reserved bacon grease and 1/4 cup vegetable oil. When hot add the chicken to sear the surface. We're still going to want to keep the bacon grease so don't throw that out quite yet!

When the chicken starts getting black-ish/brown-ish, flip to the other side. Each side should cook for a maximum of 1 to 1 1/2 minutes. Note that the chicken is not completely cooked.

Place the seared chicken on a baking sheet and bake in oven for 10 minutes. After 10 minutes remove from oven and place bacon and cheddar cheese on top. Return to oven for an additional 5 minutes.

.... and ta daa!!!! Tastiness.


But wait....

THERE'S MORE!!!

Now, we take our Swiss chard, clean it, cut off the stems, and saute it in bacon grease!!! Mmmmmmmmm. Saute until it is all melted down (like spinach). Swiss chard is a leafy vegetable with a slightly bitter taste. However, if you saute it with bacon grease or even olive oil and garlic it's very scrumptious. And healthy, too! Well, except for the bacon grease part..., but I am willing to overlook that.

Red Velvet Cake

Happy 4th, everyone. Oh dear, has it really been two months? My apologies for the lapse in recipes! Time seems to get away from me and befor...